SAS Curriculum Pathways Teacher Registration Change SAS Curriculum Pathways Teacher Registration Change

Starting May 1, 2014 SAS will update their registration system for teachers and all older generic usernames and passwords will no lon...

TwistedWave! Need a resource to trim an audio clip? Use TwistedWave to import your audio and find just the portion you want to use in you...

Wednesday Web Tool: Create Digital Flipbooks with Flipsnack Wednesday Web Tool: Create Digital Flipbooks with Flipsnack

This week we are using a great way for students and teachers to create digital projects with flipbooks. Flipsnack allows for teachers to cr...

Digital Learning Day 2014! Digital Learning Day 2014!

Today is Digital Learning Day! What is going on in your digital classroom today? Check out this special set of free resources f...

Wednesday Web Tool: GeoStories Interactive Media from National Geographic Wednesday Web Tool: GeoStories Interactive Media from National Geographic

This week, we are exploring a wonderful interactive web based tool from National Geographic. Introducing   GeoStories , a publishing  forma...

Wednesday Web Tool: Create Your Own Storybooks with Story Jumper Wednesday Web Tool: Create Your Own Storybooks with Story Jumper

Today we are featuring a free web based tool to create storybooks! Story Jumper has a great and free online creator for storybooks....

Wednesday Web Tool: Free eduClipper iPad App now available! Wednesday Web Tool: Free eduClipper iPad App now available!

Great news from eduClipper! They now have a free and powerful iPad App available. The app includes a lot of nice features such as clipp...

Wednesday Web Tool: Use Kahoot to Create Online Quizzes and Polls across platforms! Wednesday Web Tool: Use Kahoot to Create Online Quizzes and Polls across platforms!

I am very excited to share this week's FREE web tool that allows you to create interactive quizzes and polls for your students to take ...

Wednesday Web Tool: Space Math from NASA Wednesday Web Tool: Space Math from NASA

Hello! Today, we are exploring a wonderful FREE STEM resource: the Space Math website from NASA To get started, visit:  http://spac...

Wednesday Web Tool: Pixabay Creative Commons Image Search Wednesday Web Tool: Pixabay Creative Commons Image Search

Images that are posted in a Creative Commons gallery have copyright release and are free to use for educational and non-commercial products...

Wednesday Tool: SMART Notebook 11 Activity Builder Wednesday Tool: SMART Notebook 11 Activity Builder

Over the summer, most schools were updated to SMART Notebook version 11. This new version has a slightly different look and some new featur...

Friday Google Tidbit: Blogger Part II: the Art of Posting Friday Google Tidbit: Blogger Part II: the Art of Posting

Last week we covered how to create your classroom blog using Blogger.  This week, we are continuing the series with Part II: the Art of Po...

Wednesday Web Tool: START ME Custom Start Pages Wednesday Web Tool: START ME Custom Start Pages

Do your students have a hard time typing website URL's correctly? Do you give your students links to websites and somehow they stil...

Showing posts with label teacher resource. Show all posts

Monday, April 21, 2014

SAS Curriculum Pathways Teacher Registration Change


Starting May 1, 2014 SAS will update their registration system for teachers and all older generic usernames and passwords will no longer work. Teachers who already have an individual account will not have to re-register or do anything different. This change should affect only a few people as the free individual account registration has been available since 2011.

If you do need to register for an account, you can do so by clicking HERE

Please share this information with your staff.

Thursday, April 10, 2014

TwistedWave!

Need a resource to trim an audio clip? Use TwistedWave to import your audio and find just the portion you want to use in your presentation, class, website, etc. Use TwistedWave online, through its iphone/ipad app or on a mac!

To get started, you will need to have an audio file already in your documents whether it is on a flash drive, in your home directory, Google Drive, or SoundCloud account. Then you will go to: http://twistedwave.com/


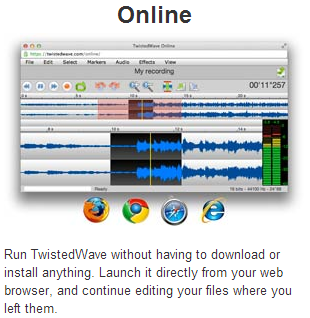
For Web access, click on Online


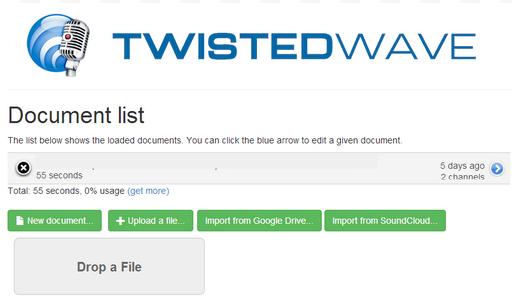
Your next step will be to upload or import the file


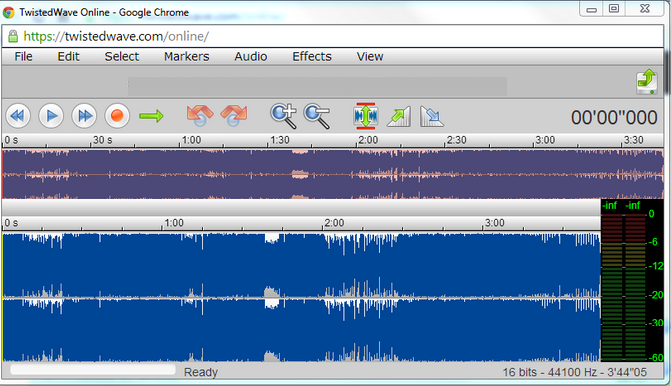
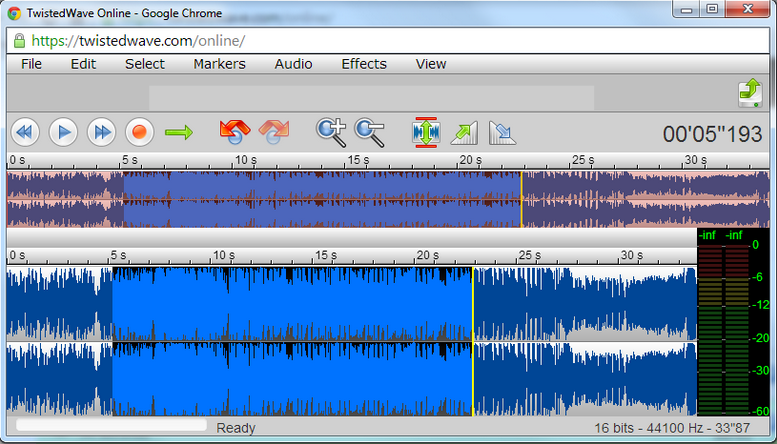
This is what the “work area” looks like when you have imported the audio.


At this time, you literally drag the beginning, ending, or selections in the middle of the audio file then click delete on your keyboard to “trim” the audio. Below shows an area of the audio selected. If I press the delete button, it would delete this selection.


You can click anywhere in the stream to play starting at that location. Once you have it edited, go to file and save. Don’t forget copyright when using audio clips from different sources.


Wednesday, March 5, 2014

Wednesday Web Tool: Create Digital Flipbooks with Flipsnack

This week we are using a great way for students and teachers to create digital projects with flipbooks. Flipsnack allows for teachers to create a free account for their classroom and add student accounts as well. Teachers can create flipbooks from exisiting materials such as PDF files and images and then assign the flipbooks to students with the click of a button. Students can also create and share flipbooks as well. This is a great option for projects and builds excitement for the reading and writing process.

To get started, go to: http://flipsnackedu.com/about.html


Click on "sign-up for edu" to register for your teacher account.


Once you have signed up for your account, you will be guided to set up your personal link to your teacher page and your classes.


If you have your rosters as a CSV file, you can upload them at once. 


Once you have your classes and students set-up, click on the new flip at the top of the page to create a book. It is three simple steps to create a book. Th first step is where you name your book, upload documents to make it, and add a description (if desired). The next step allows you to customize the appearance of the book. The last step allows you to assign the book to your classes or student groups as well as view and download your finished flipbook.


My finished flipbook, it literally took less than five minutes to create. I hope you consider making flipbooks with your class as an easy and exciting digital project!

Questions? Comments?
Please email me at: pamelabatchelor@johnston.k12.nc.us


Wednesday, February 5, 2014

Digital Learning Day 2014!


Today is Digital Learning Day!

What is going on in your digital classroom today?

Check out this special set of free resources from PBS released just for today!

Wednesday Web Tool: GeoStories Interactive Media from National Geographic

This week, we are exploring a wonderful interactive web based tool from National Geographic. Introducing GeoStories, a publishing format that combines maps, multimedia, and narrative to take viewers on tours of places and topics. GeoStories are like map-enabled slideshows that incorporate dynamic maps, pictures, video and sound, with captions, links and social sharing. 


The GeoStories span multiple topics including social studies, science, mathematics, and arts based topics. Each GeoStory has questions and vocabulary to go along with the presentation. Additional resources and links to related topics are also included.


For this GeoStory on Earth's Extremes, you can see how user friendly the site is and easily identifiable information such as key concepts and related materials available.

I hope you explore GeoStories and think about using this great free resource with your students!

Questions? Comments?
Email me at: pamelabatchelor@johnston.k12.nc.us


Wednesday, December 11, 2013

Wednesday Web Tool: Create Your Own Storybooks with Story Jumper


Today we are featuring a free web based tool to create storybooks!

Story Jumper has a great and free online creator for storybooks. Teachers can register for a free account and add their classes to create student accounts. They have premade starter books for students to edit or they can create their own book from scratch. The creator tool is very simple to learn how to use and it has everything you need to create a beautiful story.


Books can be created in minutes and printed for free. You can save the books as a PDF by using a PDF printer. Story Jumper will also publish your book in a hard copy format for a fee if you or parents would like to purchase a hard copy of a students work.

Please view the video below to see an overview of Story Jumper, how to create and manage student classes, and save your books for free:


Questions? Comments?
Please email me at: pamelabatchelor@johnston.k12.nc.us

Wednesday, December 4, 2013

Wednesday Web Tool: Free eduClipper iPad App now available!

Great news from eduClipper!

They now have a free and powerful iPad App available. The app includes a lot of nice features such as clipping pictures from devices, custom clipping, setting up classes for students, and teacher monitoring.

If you are new to eduClipper, they have a series of video tutorials that you can access HERE.

See the screenshots below from the eduClipper blog for more information:

We are proud to announce the brand new iPad app for eduClipper!  Now Available in the App Store.   Download it today and touch the future of education. Video tutorials available at https://vimeo.com/channels/634389


You can find the eduClipper app for iPad in the Apple App Store.

Credit to http://app.educlipper.net for images.

Wednesday, November 6, 2013

Wednesday Web Tool: Use Kahoot to Create Online Quizzes and Polls across platforms!

I am very excited to share this week's FREE web tool that allows you to create interactive quizzes and polls for your students to take using any internet enabled device in your classroom!

To get started, you will need to create a free teacher account at: www.getkahoot.com

Your homepage will look like this when you sign-in:


To create a new quiz, just select the create new Kahoot quiz option and you will be able to add your questions.


The interface is very simple, you enter your question, add an image or video from YouTube, and then enter the answer choices along the bottom. You then mark which choice is correct. You can add or take away answer choices by using the minus button.

Once you are finished with your first question, you can click the white "+ add question" button to create another question.

Once you have the desired number of questions, click on the green "next settings" button.


You can edit the title or order of your quiz questions. Click on the green "next settings" button to continue.


You will be asked to select the language, privacy, and audience of your quiz. You can choose to make your quiz public if you would like people to be able to search for your quizzes. Click on the green button to continue.


Finally, you can now add a cover image to your quiz if you desire.  Click on the green button to continue.

Now that you have made a quiz, you can preview it to see what it will look like:


The left side represents what will be seen on your classroom display and the right side shows you what the students will see on their device. As you can tell, you will need a projector or SMART Board to show the question screen to the students and they will respond to the question using their device. If you do not have enough devices for each student, think about using teams or groups to answer questions.

Ready to launch? 

Go to your homepage and find the Kahoot you have created and click play:


This will start the launch screen which will give you some options for gameplay:


Click on "Launch" and you will see this screen:


Your students will need to open their internet browser and type: kahoot.it (no www or http)
Then, they enter the game pin number and their name on their device.
Players will show up on the teachers screen.  Once all desired players have entered the game, click "Play" to start the quiz.

Each question will be controlled by the teacher, you will need to click on the next question to continue the quiz. Students will receive immediate feedback and a score for their answers. A scoreboard will also show after each question who is in the lead. 


At the end of the quiz, you will see a final scoreboard. You can click on download results to open an excel spreadsheet with data for each question and each student to show results and grades. You can also play the quiz again or a different quiz.

The excel spreadsheet looks similar to this:


Kahoot also has a library of quizzes and polls that other users have created. Click on the Public icon on the top of the homepage to view over two-thousand Kahoots ready to be played. 

I hope you explore this exciting and free web tool.  Your students will love to take quizzes and you will have instant data to share with them and give feedback.

Questions or comments?
Please email me at: pamelabatchelor@johnston.k12.nc.us

Wednesday, October 30, 2013

Wednesday Web Tool: Space Math from NASA

Hello!

Today, we are exploring a wonderful FREE STEM resource: the Space Math website from NASA

To get started, visit: http://spacemath.gsfc.nasa.gov/

You will start at the homepage which looks like this:


This website features math based problems in science and engineering for grade levels 3-12. Problems can be viewed by grade level, subject type, problem books, or in comprehensive STEM Modules.

Let's look at the Problem Books:


By clicking on the books tab, we are taken to the collection of problem books available. These books are grouped by release date and subject area. The books are in PDF format and have lesson ideas as well as teacher answer keys with detailed answers for each problem.

Here is what a sample problem looks like:


A great way to use the problems in PDF format would be to share the problem pages with students using their Google Drive or have the students solve the problems using the SMART Board in your classroom.

From the homepage, you can also view problems by grade level and subject area:


We hope you consider using this free resource of excellent standards based STEM problems and units developed by NASA.


Have a question or comment?
Please email me at: pamelabatchelor@johnston.k12.nc.us

Wednesday, October 16, 2013

Wednesday Web Tool: Pixabay Creative Commons Image Search

Images that are posted in a Creative Commons gallery have copyright release and are free to use for educational and non-commercial products. Pixabay is an image gallery that focuses on high quality images that are all licensed for Creative Commons use. Pixabay has a particularly large collection of cultural and international photographs.

To get started, go to: http://pixabay.com/


From the homepage, you can enter your search term in the search bar.  I'm going to look for "apples".


When your search results appear, ignore the images in the gray bar at the top of the page, those images are sponsored and not Creative Commons licensed.  You can filter your results by popularity, picture orientation, and image type (vector images have a transparent background).

Click on the image you wish to use.


Under the image, you will see a green Download button that gives you several options for image sizes.  In order to download the largest size, you will need to create a free account. No account is needed for all other sizes.


Clicking on the download button will start the download and it will automatically save the image. I hope you enjoy finding high quality images for your lessons and student projects!

Questions? Comments?
Please email me at: pamelabatchelor@johnston.k12.nc.us

Wednesday, October 2, 2013

Wednesday Tool: SMART Notebook 11 Activity Builder

Over the summer, most schools were updated to SMART Notebook version 11. This new version has a slightly different look and some new features.  One of the best new features is the activity builder tool.  This tool makes it very simple to create activities for your students to interact with the SMART Board.

The following screencast demonstrates how to use the activity builder and an example activity for math and social studies.


More detailed instructions can also be viewed HERE.

I hope this gives you some new ideas for using SMART Notebook software with your students.

If you have any questions, please email me at: pamelabatchelor@johnston.k12.nc.us

Friday, September 27, 2013

Friday Google Tidbit: Blogger Part II: the Art of Posting

Last week we covered how to create your classroom blog using Blogger.  This week, we are continuing the series with Part II: the Art of Posting. Next week, we will finish our Blogger series with tips for managing your blog and adding contributors.

To create a new post for your blog, simply click on the pencil icon next to the blog from your Blogger dashboard.


This will bring up the compose screen.


The compose screen looks a lot like a word processor.  It has many of the same functions contained in three toolbars.  Let's explore what each toolbar offers. 

 The compose toolbar which goes across the post and is highlighted in green has all of the blog post editing options.  From left to right:
  1. "Compose" which is the default mode and allows you to edit your post similar to a word processor.
  2. "HTML" which will allow you to copy and paste HTML coded videos and presentations into your blog if you chose to do so.
  3. "Undo/Redo arrows" which are not available until you make a change to the blog post.
  4. "F" allows you to change the font of your text.
  5. "tT" allows you to change the size of the text.
  6. Drop down menu which should say "Normal" allows you to change the formatting to create a header/footer if desired.
  7. "B" to bold font.
  8. "I" to italicize font.
  9. "U" to underline font.
  10. "ABC" to strikethrough font
  11. "A" with a drop down menu to change font color.
  12. "highlighter" to highlight text.
  13. "Link" to insert links within your post.
  14. "image" to insert pictures.
  15. "film" to insert videos.
  16. "torn page" to insert a jump break in your blog.
  17. "lines" to edit the alignment of your text.
  18. "numbered list" to create a numbered list.
  19. "bullets" to create a bulleted list.
  20. "quotes" to insert quotes.
  21. "Tx" to remove formatting.
  22. "ABC check" to spell check your post.
The "Post Settings" toolbar is on the right side of the screen (highlighted in red in the image above) and has the following options:
  1. Labels: this allows you to add keywords that people can use to search your blog and bring up that post.
  2. Schedule: this allows you to either publish the post immediately when you click publish or you can schedule it for a date and time to appear.
  3. Permalink: this gives you the direct link to the blog post and the option to change the link.
  4. Location: this gives you the option to add the location of the blog post (this is not recommended for security reasons).
  5. Search Description: this allows you to enter a short description of the post to help people find it.
  6. Options: allows you to allow comments to the post and a few HTML options.
The command buttons along the top right of the screen (highlighted in blue in the image above) allow you to publish your post, save your post, preview your post, and close the post.  The preview option is very helpful as that is what will be visible and can show you alignment or picture issues.

Let's go ahead and enter some text in our first post. It is a good idea for the first post to be a welcome message. We are going to state the blog purpose and a little bit about ourselves. 

Now we need to add a picture to add reader interest and knowledge. Blogs should be very visual.  To add an image, click on the image button and this screen will show:


You can upload pictures from several places including the internet, a webcam, and your hard drive. Once you choose a file, you will click on it to select it and then "add selected" to add the image to your blog post. You can add several images at once if desired.

You can also add a video to the blog post by clicking on the film button.


Again, you will need to choose where the video is located.  You can add videos directly from YouTube, which is a nice feature.

You can also add links to your post.  To do so, click on the "Link" button and fill in the information on this screen:


Notice that you can link to your email address as well as a website.  Also you can "test this link" to make sure you have the correct URL.  Click "OK" to save your link.

Once you have added all the desired information, images, and videos, you should click on the "Preview" button to make sure your post looks correct. Here is my preview:


Ready to publish? Click on the publish button and your post will be made live unless you scheduled it for a later time.

You have just published your first post on Blogger!!!

Join us next week for tips on managing your blog and extra features!

Questions? Comments?

Please email me at: pamelabatchelor@johnston.k12.nc.us

Wednesday, September 25, 2013

Wednesday Web Tool: START ME Custom Start Pages

Do your students have a hard time typing website URL's correctly?

Do you give your students links to websites and somehow they still end up on the wrong website?

Today we are featuring a free web tool that allows you to very quickly create custom start pages.

To get started, go to www.startme.com


You will need to create a free account by clicking the login button on the top right corner and then click on create account.


Once you create your account, you will be taken to your start page.


Your page will have these categories and links already but you can edit them or delete them quickly by pressing the x button on the top right corner of each box.  To edit an individual link, move your cursor to the link and double click it.

I deleted all of my default boxes so I could make my own start page for students.


I made link lists by subject area but the possibilities are endless. To create a new link list, click on the add list button on the bottom of the page, give your list a title, and add links by clicking on the new bookmark option.  You can edit each link and give the link a title that is separate from the URL.

When you are happy with your start page, click on the save page option in the top right corner. You will then be taken to the live version of your start page. 


designed my start page by subject area but you could easily have a link list for each block or for a specific project. You can set-up multiple start pages for yourself or multiple classes by clicking on the +New button on the top of the page. To share the start page, you will need to go to startme website and login for student to view the page.

How are you going to use custom start pages?

Questions or comments? Please email me at pamelabatchelor@johnston.k12.nc.us